

That Cheesecake Factory Crush
You know that feeling. You’re sitting in the oversized booth, the menu is basically a novel, and you already know what you’re going to order. The Cheesecake Factory crusted chicken romano. That golden, craggy crust that shatters when you cut into it, with the sharp bite of romano in every crunch. It’s the dish I’ve ordered for years, every single time.
Honestly, I used to think I needed a deep fryer and a chef’s degree to pull this off at home. Then I figured out the secret, and I promise, it’s way simpler than you think. This copycat cheesecake factory chicken romano emerges from your oven, not a fryer, and it nails that crisp factor.
This isn’t just a recipe. It’s the answer to the “where should we eat?” question. It’s the dinner you make when you need a hit of that chef-y, restaurant-style energy without putting on real pants. Trust me, once you see how easy this is, the Cheesecake Factory might lose a regular customer.
Why This Cheesecake Factory Copycat Works
This cheesecake factory crusted chicken romano recipe skips the messy shallow frying most copycats use. Instead, we bake it. This is the move that makes it a weeknight hero. You get the crunch without the splatter, the stovetop oil burns, or the lingering smell of fry oil in your kitchen for two days.
Here’s what makes it actually work:
- The panko and romano crust: Panko breadcrumbs stay airy and crispy, while the Pecorino Romano brings that salty, funky, sharp kick that’s unmistakable.
- Lemon zest: This is the California twist that brightens the whole thing. It cuts through the richness and makes the crust taste fresh, not just fried. Meyer lemon zest is even sweeter if you can find it.
- Melted mozzarella: The gooey, melty finish on top. It adds that restaurant-looking blanket of cheese that makes everyone lean in closer when you set the pan down.
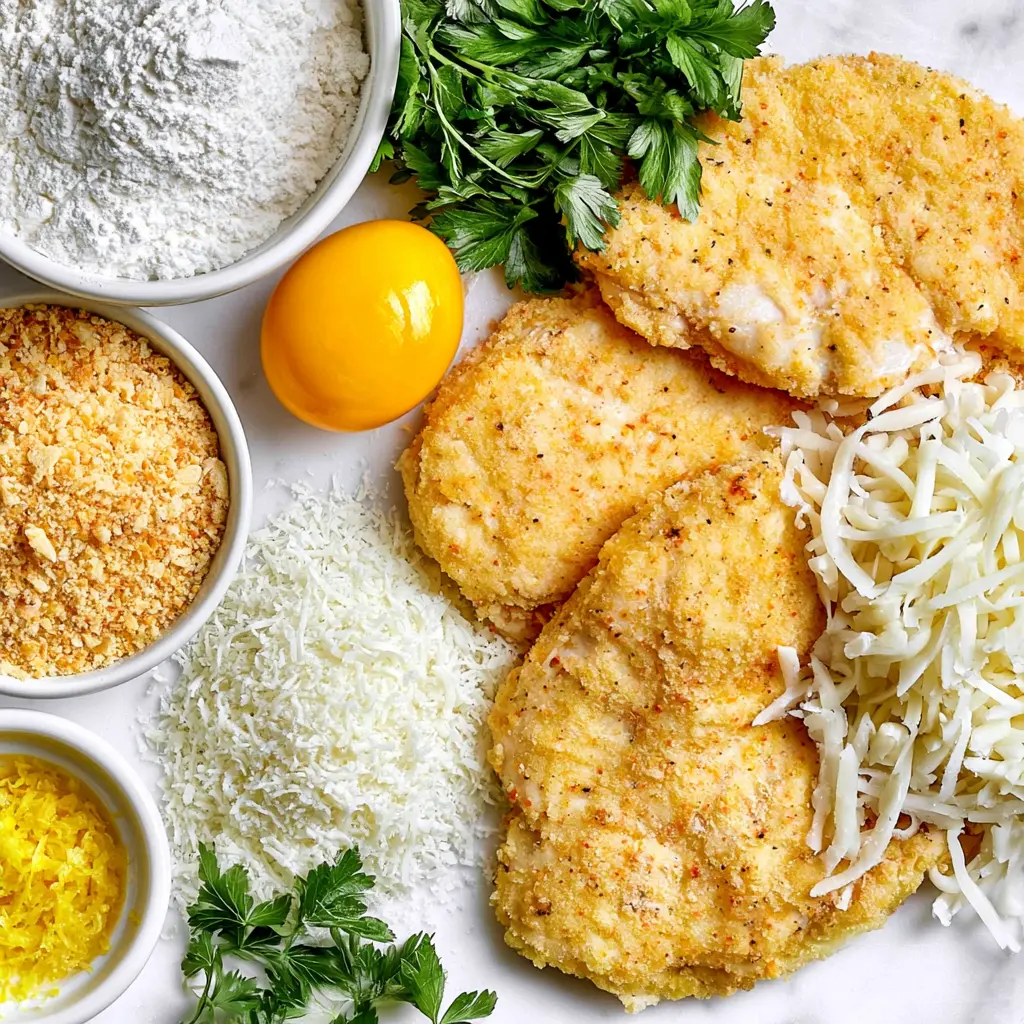
Ingredients for Crusted Chicken Romano
The ingredient list is short and honest. No weird stuff. A trip to Ralphs, Vons, or just your local Trader Joe’s will cover it. Here’s the lineup for this homemade version:
- Boneless, skinless chicken breasts: You’ll want about 2 pounds, sliced horizontally into thin cutlets.
- All-purpose flour: This is the first stop in the breading line. It helps the egg stick and creates a dry base for the crust.
- Large egg, beaten: The glue that holds the crust on. Non-negotiable.
- Panko breadcrumbs: The crunch maker. Regular breadcrumbs work in a pinch, but panko is the real deal.
- Grated Pecorino Romano cheese: Don’t swap this for parmesan lightly. Romano is sharper, saltier, and that’s the flavor you remember from the restaurant menu.
- Fresh flat-leaf parsley: A little freshness in the crust makes it taste alive, not heavy.
- Freshly grated lemon zest: The quiet hero. It smells amazing and adds that citrus lift.
- Avocado oil: You’ll drizzle this over the breaded chicken before baking. It helps the crust brown and crisp up. Olive oil works too.
- Shredded low-moisture mozzarella: The melty blanket. Low-moisture is key. It melts beautifully without making everything watery.
Make Cheesecake Factory Crusted Chicken Romano
The first time I made this, the crust fell off in one giant sad sheet. I’m not kidding. It looked like a chicken breast wearing a blanket it was trying to take off. Here’s what I learned, so you don’t have to go through it.
This isn’t a step-by-step repeat of the card below. This is the why behind the method, the stuff that makes you actually successful.
Stage 1: Get Your Cutlets Thin
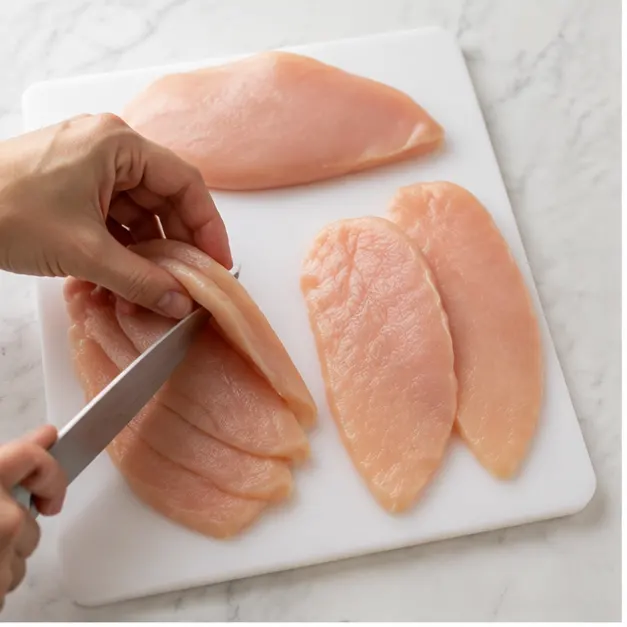
Pound the chicken thin. That’s the whole secret. Thick chicken equals burnt crust and raw middle. You want even, thin cutlets about half an inch thick. If they’re too thick, take a meat mallet or rolling pin and give them a few taps between sheets of parchment paper. You don’t have to be perfect at this. Some unevenness is fine, it all cooks the same. Season both sides with salt and pepper at this stage, so the flavor works its way into the meat, not just the crust.
Here’s a pro tip: butterflying the chicken breasts yourself is easy, but if you see pre-sliced chicken cutlets at the store, grab those. It’s a total time saver.
Stage 2: Set Up Your Dredging Stations
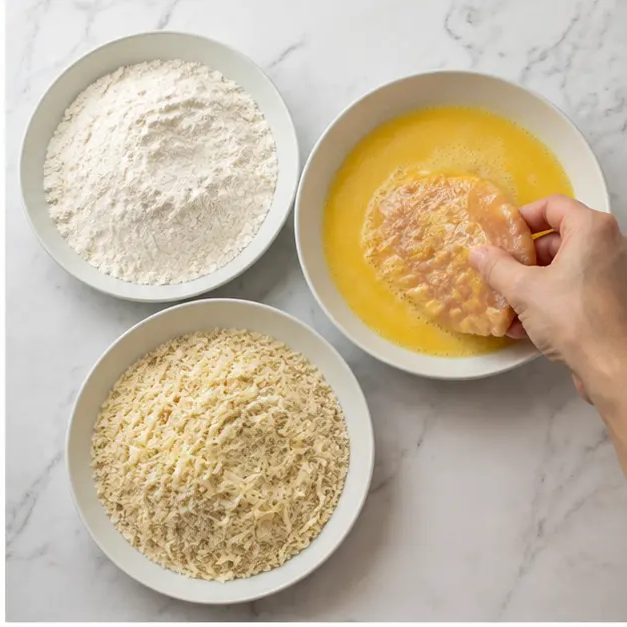
This is the assembly line. You need three shallow dishes. One with flour, one with the beaten egg, and one with the panko mixed together with the romano cheese, parsley, and lemon zest. Have everything laid out before you start. Once the chicken touches the flour, you want to be in motion.
The flow is simple: flour, then egg, then panko. Working one piece at a time, dredge the chicken in the flour and shake off the excess. Dip it into the egg, let the extra drip off, then press it into the panko mixture until it’s evenly coated. Press firmly. The crust needs to hug the chicken.
Stage 3: Bake for That Golden Crust
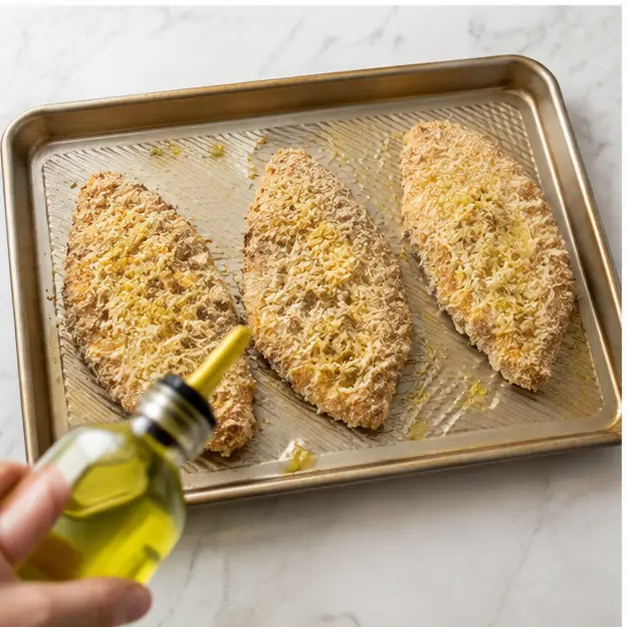
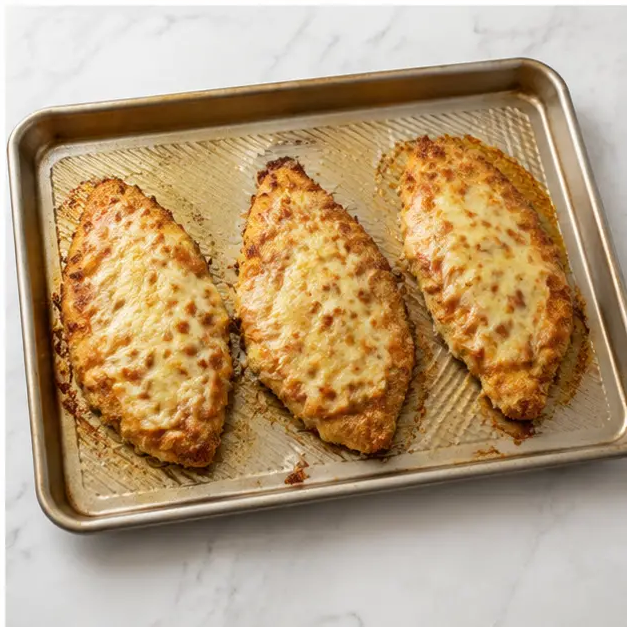
Heat the oven to 400°F. Place the breaded chicken on a lightly oiled baking sheet. This is important for crispy results. Drizzle the tops with your avocado oil. Think of this as giving the crust a head start on browning. Bake for about 15 minutes, until the crust is golden brown and the internal temperature hits 165°F. A meat thermometer is your best friend here. It takes the guesswork out and guarantees juicy chicken, not a dry, tragic excuse for dinner.
Let the breaded chicken rest for 5 minutes before baking if you have the time. It helps the coating adhere so it doesn’t slide off.
Stage 4: The Melted Mozzarella Finish
During the final few minutes of baking, sprinkle the shredded mozzarella over each cutlet and let it melt. That’s the visual cue that it’s ready. You’ll see those golden edges and the gooey cheese pulling in every direction. Let it come out of the oven and sit for just a minute before you serve. This makes it easier to plate without the crust sliding off.
It’s a thing of beauty. That golden, craggy crust with the sharp bite of romano in every crunch. Honestly, my kitchen smelled like a restaurant in those 15 minutes.
Tips for the Crispiest Crusted Chicken Romano
These are the make-or-break details. Learn from my kitchen mistakes so your crust stays put and stays crunchy.
- Pound the chicken into thin, even cutlets. This is non-negotiable. Thick chicken = burnt crust and raw middle.
- Use a high-smoke-point neutral oil. Avocado oil works perfectly. Butter or olive oil can burn and turn bitter in the oven.
- Don’t overcrowd your baking sheet. You want air circulating around each piece so the bottom stays crisp, not steamed.
- Grate your own cheese. Pre-shredded cheese has anti-caking agents that mess with melting. Freshly grated romano and a low-moisture mozzarella block are worth the two extra minutes.
- Let the breaded chicken rest. Give it 5 minutes before baking so the coating adheres to the chicken.
Quick & Easy Shortcuts
Life is busy. I get it. These shortcuts still get you a stellar dinner:
- Pound and season the chicken up to 24 hours in advance. Keep it covered in the fridge, then just set up your dredging stations when you’re ready to cook.
- Bread the chicken in advance. Follow the recipe, bread the cutlets, and refrigerate them on a tray. Bake when you’re ready, just add the mozzarella in the final minutes.
- Use frozen breaded filets as a shortcut. Honestly, baking them until crispy and topping with mozzarella works in a pinch, though the romano flavor won’t be as bright.
- Try Italian-style breadcrumbs if you don’t have panko. It’s a slightly different texture, but still good.
Easy Variations & Substitutions
This is where you make it yours. It’s a forgiving recipe.
- Make it gluten-free: Swap the all-purpose flour for a 1:1 gluten-free flour blend and use gluten-free panko. It works surprisingly well.
- Try almond flour in the dredging mix for a lower-carb option, paired with a gluten-free panko.
- Swap the cheese: Mix in some parmesan or asiago with the romano if that’s what you have. A parmesan crust is a classic for a reason.
- Crushed cornflakes: Coat your chicken with crushed cornflakes instead of panko for a different, extra-crunchy texture.
- Add herbs: The recipe calls for parsley, which is great. You could also add a pinch of dried Italian seasoning to the panko mix for a more classic herbal note.
What to Serve with Crusted Chicken Romano
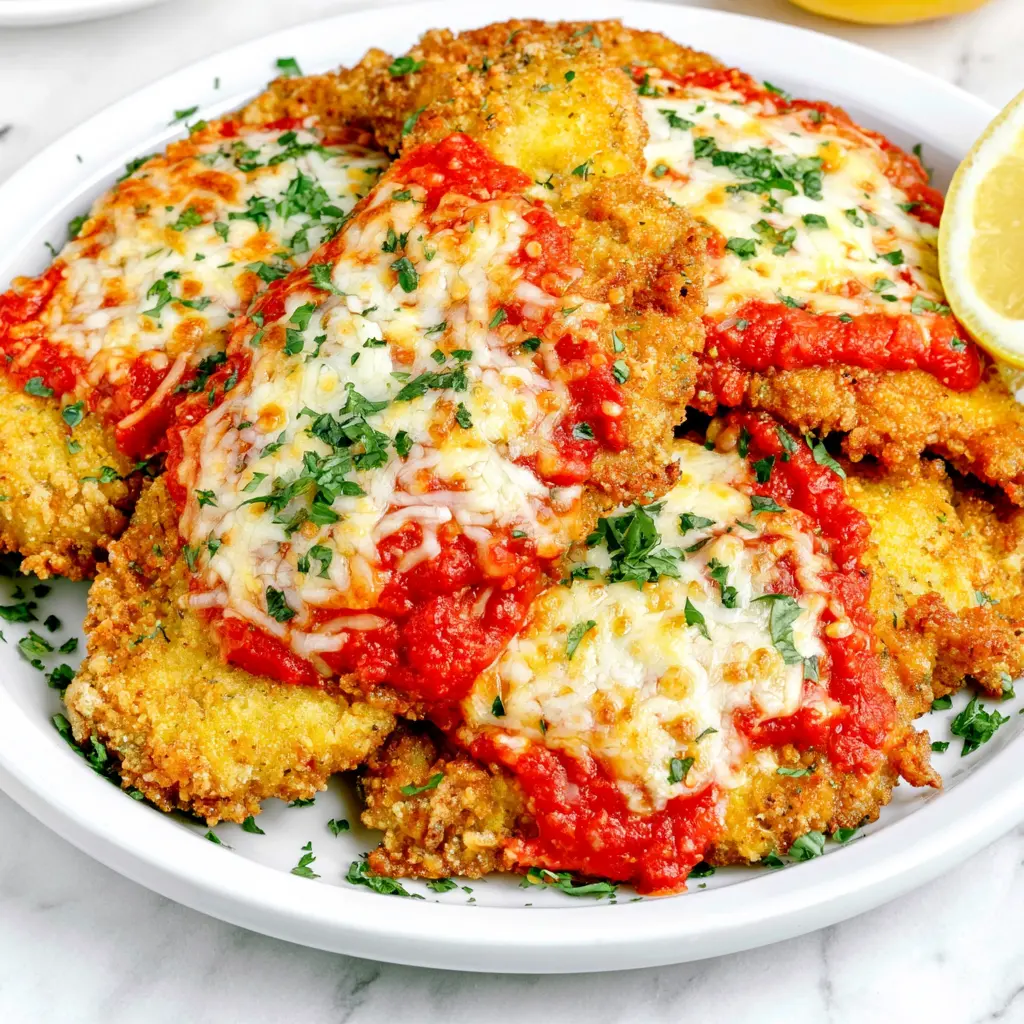
At the restaurant, this beauty usually lands on a bed of creamy pasta, sometimes with a lemon butter sauce. At home, I like to keep it simple and let the chicken steal the show.
My favorite move is serving it over angel hair pasta tossed in a little garlic butter or a jarred four-cheese pasta sauce if I’m in a rush. It’s a combination that feels straight off the Cheesecake Factory menu. Here are some other easy sides:
- Lemon wedges to squeeze over the top. This brings back that bright, fresh flavor.
- A crisp green salad with a simple vinaigrette to cut through the richness.
- Roasted asparagus or sautéed spinach for a restaurant-quality green veggie side.
- Spaghetti or any long pasta with a creamy alfredo sauce if you’re feeling indulgent.
Storage & Reheating Leftovers
If you somehow have leftovers, here’s how to keep that crispy crust from turning into a soggy mess.
Cool completely before refrigerating. This is key. If you pack it away while it’s still warm, the steam gets trapped and the crust softens. Store in an airtight container in the fridge for up to 3 to 4 days. You can also freeze the cooked chicken pieces individually wrapped for up to a month.
When you’re ready to eat, skip the microwave unless you’re completely desperate. Microwaving makes the crust soggy and rubbery. Instead:
- Oven method (best): Reheat on a baking sheet in a 350°F oven for 10 to 15 minutes, or until warmed through and crisp again.
- Toaster oven: Same idea, and it works perfectly for one or two pieces.
- Air fryer: If you have one, use it. It brings back that crunch even better than the oven.
FAQs: Cheesecake Factory Crusted Chicken Romano
The Best Dinner Decision You’ll Make This Week
When you make this, and you will, there’s going to be a moment. You pull that baking sheet out, the cheese is bubbling, the crust is golden, and the smell fills your kitchen. It’s better than any takeout container. It’s the cheesecake factory crusted chicken romano you love, made by you. And honestly, that pride never gets old.
It’s been my go-to for a weeknight dinner that feels like a special occasion, and a family meal that makes everyone go quiet while they eat. It brings the joy of a favorite restaurant meal into your own kitchen, any night of the week.
Build that kitchen confidence, one successful recipe at a time. When you make this, tag me and let me know how it goes. I’d love to see that golden, crispy crust. And if you’re looking for more inspiration, you can find me on my Pinterest where I’m always pinning easy dinner ideas.

Easy Cheesecake Factory Crusted Chicken Romano (California Copycat)
Ingredients
Method
- Heat the oven to 400°F. Slice the chicken breasts lengthwise into thinner cutlets, then season both sides with salt and pepper.
- Set up three shallow dishes: one with the flour, one with the beaten egg, and one with the panko stirred together with the Romano cheese, parsley, and lemon zest.
- Working one piece at a time, dredge the chicken in the flour, shake off excess, dip it into the egg, then press it into the panko mixture until evenly coated.
- Place the breaded chicken on a lightly oiled baking sheet and drizzle with the avocado oil. Bake for about 15 minutes, until golden brown and the internal temperature reaches 165°F.
- During the final few minutes of baking, sprinkle the shredded mozzarella over each cutlet and let it melt before serving.
Nutrition
Notes
Tried this recipe?
Let us know how it was!Source: Learn More About This Dish
Is the crusted chicken Romano good at Cheesecake Factory?
It’s one of the most beloved dishes on the Cheesecake Factory menu for a reason. The combination of a crispy, cheesy crust with juicy chicken and melted mozzarella is a crowd-pleaser. This copycat recipe captures that same crave-worthy flavor at home, and you can make it anytime.
How to make Cheesecake Factory crusted chicken romano?
Slice chicken breasts into thin cutlets, season them, then dredge through flour, beaten egg, and a panko-romano mixture with lemon zest and parsley. Place on an oiled baking sheet, drizzle with oil, and bake at 400°F for 15 minutes. Add mozzarella for the final few minutes of baking.
Can Crusted Chicken Romano be prepped ahead?
Yes! Bread the chicken, place the coated cutlets on a tray, and refrigerate for up to 24 hours. When you’re ready, bake them as directed, adding the mozzarella in the final minutes. This makes it a fantastic option for a stress-free weeknight dinner or when hosting guests.
What’s the difference between Romano and Parmesan cheese?
Romano (Pecorino Romano) is made from sheep’s milk and has a sharper, saltier, more tangy flavor than parmesan, which is made from cow’s milk and is nuttier and more mild. For this cheesecake factory crusted chicken romano, the romano provides a distinct, bold flavor that you can really taste in the crispy crust.
What size should I grate the cheese for the crust?
Use a fine grater, like a microplane, for the Pecorino Romano. You want the cheese to be powdery so it mixes evenly into the panko breadcrumbs and creates a cohesive coating on the chicken. This also helps it melt into the crust as it bakes, rather than just sitting on top.
How to make chicken cutlets and what is the secret to frying them without burning?
To make cutlets, slice a boneless, skinless chicken breast horizontally into two or three thinner pieces, then pound them to an even thickness. For this recipe, the secret is baking at a high temperature rather than frying. This cooks them evenly without burning the outside, and a meat thermometer ensures juicy results.
How to reheat Cheesecake Factory Crusted Chicken Romano?
To keep the crust crispy, reheat it in a 350°F oven or a toaster oven for 10 to 15 minutes. This method restores the crunch and heats the chicken through without making the coating soggy, unlike a microwave would. Let the dish come to room temperature after cooking for the best results.